Rosemary & Roasted Garlic Artisan Bread Recipe
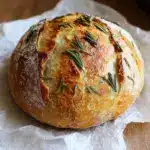
This Rosemary & Roasted Garlic Artisan Bread is a flavorful homemade loaf featuring fragrant rosemary and sweet roasted garlic. Slow fermentation and baking in a Dutch oven yield a crusty exterior with a soft, tender crumb, perfect for sandwiches or serving alongside your favorite meals.
- Prep Time: 20 minutes (plus 40 minutes roasting garlic and 8-10 hours dough rising)
- Cook Time: 50 minutes
- Total Time: 9-11 hours (including resting and rising times)
- Yield: 1 medium artisan loaf (about 8-10 servings) 1x
- Category: Bread
- Method: Baking, Roasting
- Cuisine: American/Fusion Artisan
- Diet: Vegetarian
Ingredients
Scale
Roasted Garlic
- 1 head garlic
- Extra-virgin olive oil (about 1 tablespoon for roasting)
- Coarse sea salt and freshly ground black pepper, to taste
Bread Dough
- 1½ cups water, room temperature (at or near 70°F / 21°C)
- 1 teaspoon active dry yeast
- 3 cups bread or all-purpose flour, plus more for dusting
- ½ teaspoon dried oregano
- 1 teaspoon kosher or fine sea salt
- 2 teaspoons finely chopped rosemary, plus more to sprinkle on top
- 1 whole head roasted garlic, smashed (from the roasted garlic step)
- 1 tablespoon extra-virgin olive oil
Instructions
- Roast the garlic: Slice the garlic head in half horizontally to expose the cloves. Drizzle the exposed cloves with olive oil and season with coarse sea salt and freshly ground black pepper. Wrap the garlic head tightly in foil and place it on a baking sheet. Roast in a preheated oven at 400ºF (204ºC) for 40 minutes. Remove from oven and allow to cool. Once cooled, squeeze the roasted garlic cloves out of their skins and set aside.
- Activate the yeast: Sprinkle the active dry yeast over the room temperature water (around 70°F / 21°C). Let it sit for 10-15 minutes until the yeast becomes frothy and bubbly, indicating it is active.
- Mix dry ingredients: In a large bowl, combine the flour, dried oregano, kosher salt, and finely chopped rosemary. Stir to evenly distribute the herbs and salt throughout the flour.
- Combine dough ingredients: To the dry ingredients, add the activated yeast mixture, the smashed roasted garlic cloves, and olive oil. Using a rubber spatula, mix everything together just until combined. The dough will be slightly sticky and stringy with some scattered flour around the edges of the bowl.
- First rise: Cover the bowl with a clean kitchen towel or plastic wrap and place it in a warm spot (ideally 75-80°F / 24-27°C) to rise until doubled in size, approximately 8 to 10 hours. This slow fermentation develops flavor and texture.
- Shape the dough: When doubled, gently transfer the dough to a floured surface using floured hands or a dough scraper. Fold the dough onto itself several times to form a soft, round ball coated lightly with flour. Place the dough seam side up into a floured bowl or proofing basket. Dust the top with flour, cover, and refrigerate for at least 1 hour and up to 24-48 hours if you want to bake later.
- Preheat oven and vessel: About 30 minutes before baking, preheat your oven to 450ºF (232ºC) with a Dutch oven or heavy covered baking vessel inside to heat through.
- Prepare for baking: When ready, remove the dough from the refrigerator and invert the bowl to release the dough seam side down onto a piece of parchment paper. Gently shape it into a loaf if needed. Score the top with a sharp knife or razor blade to create a decorative pattern and allow steam to escape.
- Bake the bread: Carefully remove the hot Dutch oven from the oven and transfer the dough on the parchment paper into it. Cover with the lid and bake for 30 minutes. Then remove the lid and bake for an additional 15-20 minutes until the crust is deeply browned and the loaf sounds hollow when tapped.
- Cool the bread: Using the parchment edges, lift the bread out of the Dutch oven and place it on a wire rack. Allow it to cool for up to an hour before slicing to let the crumb set and prevent gummy texture.
Notes
- For best results, use room temperature water around 70°F (21°C) to activate the yeast without killing it.
- The long, slow rise can be done overnight or during the day depending on your schedule; the dough improves in flavor with more fermentation time.
- If you do not have a Dutch oven, use any heavy covered pot or bake the loaf on a baking sheet with a pan of water to create steam.
- Scoring the bread before baking allows for controlled expansion and prettier crust patterns.
- Store leftover bread wrapped in a tea towel or bread bag at room temperature for up to 3 days for best texture.
Nutrition
- Serving Size: 1 slice (about 1/10th of loaf)
- Calories: 160 kcal
- Sugar: 1 g
- Sodium: 210 mg
- Fat: 3.5 g
- Saturated Fat: 0.5 g
- Unsaturated Fat: 3 g
- Trans Fat: 0 g
- Carbohydrates: 28 g
- Fiber: 2 g
- Protein: 5 g
- Cholesterol: 0 mg
Keywords: artisan bread, roasted garlic bread, rosemary bread, homemade bread, no-knead bread, Dutch oven bread, savory bread