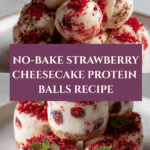
Strawberry Cheesecake Protein Balls Recipe
Introduction
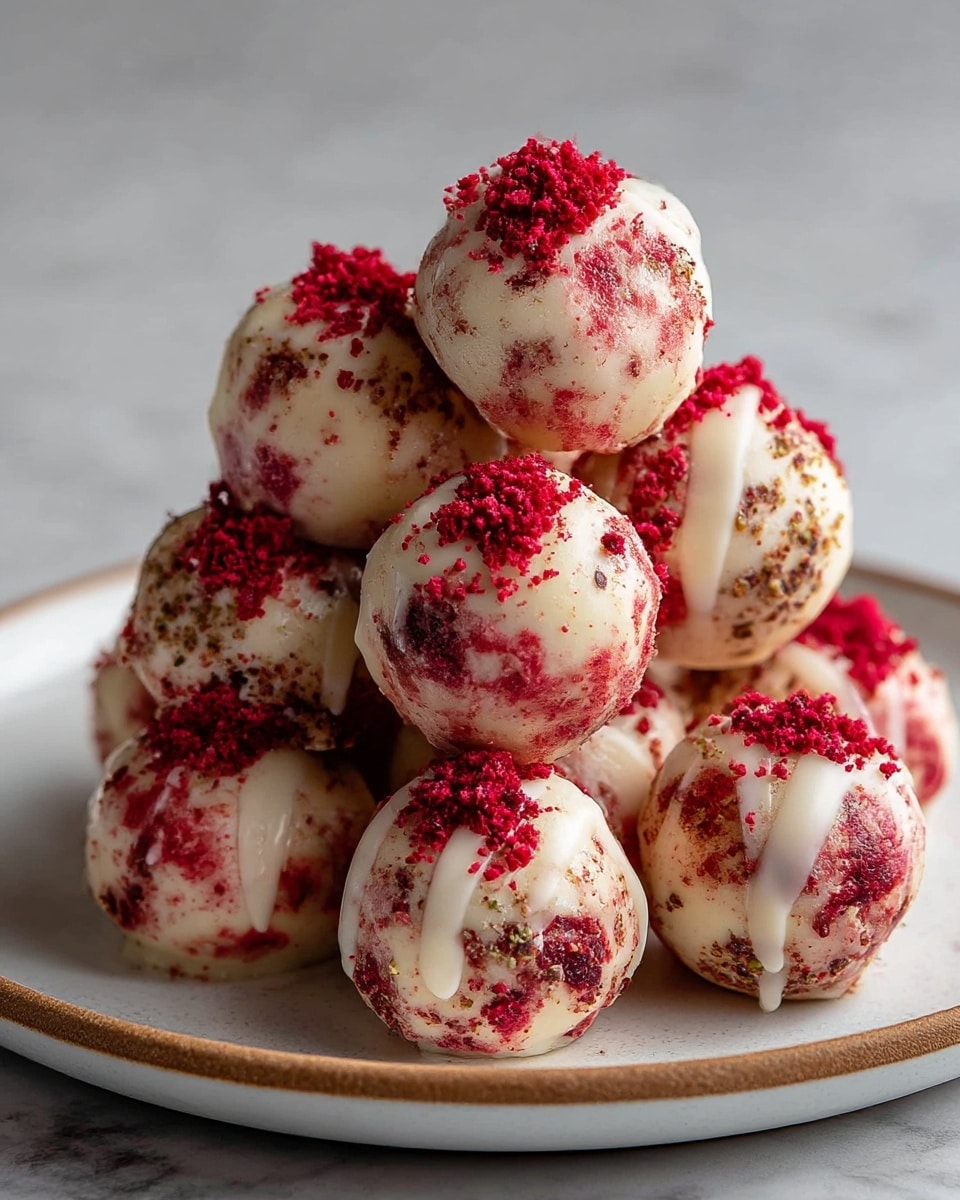
Strawberry Cheesecake Protein Balls offer a delightful, guilt-free treat that combines the creamy taste of cheesecake with the fresh burst of strawberries. These no-bake, protein-packed bites are perfect for a quick snack or a healthy dessert, and they come together in just minutes.
Ingredients
- 1 cup rolled oats
- 1/2 cup vanilla protein powder (whey or plant-based)
- 1/4 cup freeze-dried strawberries, crushed
- 1/4 cup cream cheese, softened
- 2 tablespoons honey or maple syrup
- 2 tablespoons unsweetened almond milk (or any milk)
- 1 teaspoon vanilla extract
- Pinch of salt
- Optional: Extra crushed freeze-dried strawberries for coating
Instructions
- Step 1: If you prefer a smoother texture, pulse the rolled oats in a food processor for a few seconds to partially grind them. This step is optional but helps reduce chewiness.
- Step 2: In a large bowl, whisk together the rolled oats (or ground oats), vanilla protein powder, crushed freeze-dried strawberries, and a pinch of salt until evenly combined.
- Step 3: Add the softened cream cheese, honey (or maple syrup), almond milk, and vanilla extract to the dry mixture. Make sure the cream cheese is softened for easy mixing.
- Step 4: Mix everything thoroughly using a spoon or your hands until a sticky dough forms. Adjust the consistency by adding more almond milk if too dry, or extra oats/protein powder if too wet.
- Step 5: Using a small cookie scoop or tablespoon, portion out the dough and roll each into a smooth ball between your palms.
- Step 6: If desired, roll each protein ball in extra crushed freeze-dried strawberries or an alternative coating like shredded coconut, chopped nuts, or cocoa powder for added flavor and texture.
- Step 7: Place the protein balls on a parchment-lined tray or plate, then chill them in the refrigerator for at least 30 minutes to firm up and meld flavors.
- Step 8: Transfer the chilled protein balls to an airtight container for storage.
Tips & Variations
- Soften cream cheese by leaving it at room temperature for 30 minutes before starting to ensure smooth mixing.
- For a different flavor, try swapping vanilla protein powder with chocolate or berry-flavored varieties.
- If you don’t have freeze-dried strawberries for coating, use shredded coconut, chopped nuts, or a light dusting of cocoa powder.
- Partial grinding of oats helps achieve a less chewy, finer texture, but it’s optional based on your preference.
Storage
Store the protein balls in an airtight container in the refrigerator for up to one week. For longer storage, freeze them in a freezer-safe container or bag for up to one month. To enjoy, thaw frozen protein balls in the refrigerator for a few hours before eating.
How to Serve
Serve this delicious recipe with your favorite sides.
FAQs
Can I use regular fresh strawberries instead of freeze-dried?
Fresh strawberries contain moisture, which can change the texture of the protein balls. Freeze-dried strawberries help keep the mixture dry and firm, but you could try finely chopping fresh strawberries and reducing some liquid ingredients to compensate.
Are these protein balls suitable for vegans?
Yes, by using plant-based vanilla protein powder, vegan cream cheese, and maple syrup instead of honey, you can make these protein balls vegan-friendly.
PrintStrawberry Cheesecake Protein Balls Recipe

Strawberry Cheesecake Protein Balls are a delicious, no-bake snack that combines the creamy richness of cheesecake with the fresh, tangy flavor of strawberries. Packed with protein and easy to make in minutes, these bite-sized treats are perfect for a quick post-workout boost, a healthy dessert alternative, or an energizing afternoon snack. With rolled oats, protein powder, cream cheese, and freeze-dried strawberries, they offer a perfect balance of taste and nutrition without the guilt.
- Prep Time: 10 minutes
- Cook Time: 0 minutes
- Total Time: 40 minutes (including chilling time)
- Yield: 12 protein balls 1x
- Category: Snack
- Method: No-Cook
- Cuisine: American
- Diet: Low Fat
Ingredients
Dry Ingredients
- 1 cup rolled oats
- 1/2 cup vanilla protein powder (whey or plant-based)
- 1/4 cup freeze-dried strawberries, crushed
- Pinch of salt
Wet Ingredients
- 1/4 cup cream cheese, softened
- 2 tablespoons honey or maple syrup
- 2 tablespoons unsweetened almond milk (or any milk)
- 1 teaspoon vanilla extract
Optional
- Extra crushed freeze-dried strawberries for coating
Instructions
- Prepare the oats: Optionally pulse the rolled oats in a food processor for a few seconds until partially ground for a smoother texture, or use them as is for a chewier bite.
- Combine dry ingredients: In a large mixing bowl, whisk together the rolled oats (or ground oats), vanilla protein powder, crushed freeze-dried strawberries, and a pinch of salt to evenly distribute the flavor components.
- Add wet ingredients: Add the softened cream cheese, honey or maple syrup, unsweetened almond milk, and vanilla extract to the dry mix. It is important that the cream cheese is softened for easy incorporation, ideally left at room temperature for about 30 minutes before starting.
- Mix the dough: Use a sturdy spoon or your hands to thoroughly combine all ingredients until a slightly sticky dough forms. Adjust the consistency by adding almond milk one teaspoon at a time if too dry, or a tablespoon of rolled oats or protein powder if too wet. The dough should hold its shape when rolled.
- Roll into balls: Using a small cookie scoop or tablespoon, portion out dough, then roll between your palms into smooth, round balls. Imperfect shapes are perfectly fine.
- Coat the balls (optional): Roll the protein balls in extra crushed freeze-dried strawberries to add extra flavor and an attractive coating. Alternatively, use shredded coconut, chopped nuts, or cocoa powder as a coating.
- Chill and set: Arrange the protein balls on a parchment-lined baking sheet or plate to avoid sticking, then refrigerate for at least 30 minutes to firm up and let flavors meld.
- Store properly: After chilling, transfer the protein balls to an airtight container and store in the refrigerator for up to a week. For extended storage, freeze them in a freezer-safe container for up to a month and thaw before eating.
Notes
- Softening the cream cheese beforehand is key for smooth mixing and texture.
- Partial grinding of oats is optional, depending on your preferred texture.
- Adjust the dough moisture carefully by adding almond milk or dry ingredients as needed.
- You can substitute maple syrup for honey to keep it vegan-friendly.
- The protein powder can be whey-based or plant-based, depending on dietary preference.
- Coating options can vary—freeze-dried strawberries offer extra strawberry flavor, but coconut or nuts also work well.
- Store the balls in the fridge for up to a week or freeze for longer freshness.
Keywords: Strawberry, Cheesecake, Protein Balls, No-Bake, Healthy Snack, Post-Workout Snack, High Protein, Easy Snack